How to create a menu link
Sometimes, you’ll want to include a link to your content in a site menu. Basic Pages and Webforms can be included in site menus; Events cannot.
Tyndale’s website includes many menus. You can place menu links in the submenus that show up in the sidebar of many pages.
When editing your Basic Page or Webform, at the bottom of the edit form you will see several vertical tabs. Click the “Menu Settings” tab, then click the “Provide a menu link” checkbox.
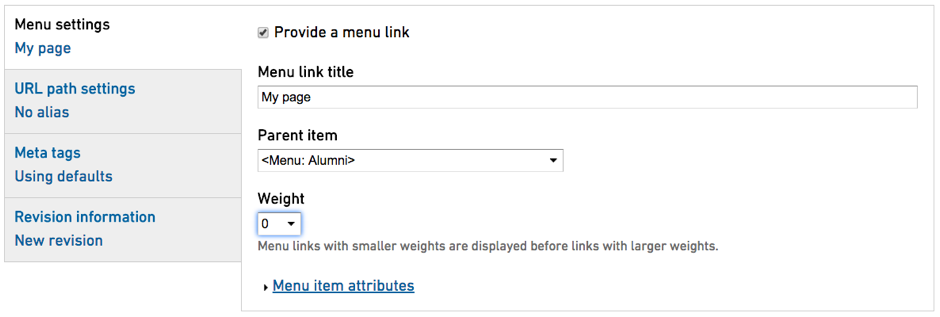
“Menu link title” is the actual text that will show up in the menu. Often, this will be the same as your page title.
“Parent item” determines which menu, and where in the menu, your link will appear. Tyndale has many menus, so it’s crucial to select the correct option. Usually, the menu will be the same as the Site Section that you select when you create your content. For example, if your Site Section is the TIM Centre, you would scroll to find <Menu: Tim Centre>.
When you click the Parent item dropdown, you will see several items.
-
Angle brackets <> surround the name of the menu, for example <Menu: Alumni>. If you select the menu name as the parent item, your link will show up in the top level of the menu. This means it will be immediately visible in the menu at the side of the page when a user visits a page with this menu.
-
Hyphens indicate menu items and their placement, or hierarchy, in the menu. Two hyphens – before a menu item name indicate a top level menu link. Four hyphens indicate a child of a top-level menu link, i.e., a second-level link. And so on. When you view the menu on a page, » to the right of a menu item indicates that it has child menu items; if you click on that menu item, you will see its child menu link(s) below it in the menu on that page.
The first step is to find the menu that you want your link to be part of, then choose where in the menu to place it.
-
If you want your menu item to be in the top level of the menu, select the <Menu Name>.
-
If you want your menu item to show up under one of the existing menu items, select that menu item in the list.
For example, say that we have a menu called Fruit. We have a page called “Apples”, and we want this page to appear as a link in the top level of our Fruit menu. We’d select <Menu: Fruit> as the parent item, and we’d enter the Menu link title “Apples”.
We then create another page called “Golden Delicious”, and want to add this page to the menu as a “child” of the Apples menu item, so the link will appear under Apples. In the Parent Item dropdown, we’d navigate to <Menu: Fruit>, and select – Apples. In the Menu link title, we’d put “Golden Delicious”.
-
Please note that even after saving, the menu item won’t show up in the chosen menu until your content has been approved and published by the webteam. See Content Approval for more information on this process.
Putting your menu item in the correct spot and changing the order of menu items can be challenging. If you have any difficulties, contact the webteam for assistance.
Removing a menu link
What if you no longer want a link to your page in the menu? There are a couple of ways to accomplish this:
-
If you no longer want the page to be published on the website, but don’t want to delete it, set the Workflow state back to Draft, and save the content. Your page will be unpublished, and the menu item will disappear.
-
If you want your page to remain published on the site, but just want to remove the menu link:
-
Click the “edit” tab at the top of your page while logged in
-
Scroll down to the “Menu Settings” tab and click to select it
-
Click the “Provide a menu link” checkbox to the right to deselect it
-
Save your page. The menu link will be removed.
-