How to Create an Anchor Link
What is an anchor link?
An anchor link is a link which goes to another part of the same page, rather than going to another page or file.
Anchor links are typically used in long documents, to allow the user to jump directly from a table of contents to the relevant section of the document. A well-known website that uses anchor links this way is Wikipedia.
If you have a long webpage and can’t break it up into smaller pages, anchor links are a good option. They allow the user to see the document contents at a glance, and easily and quickly jump to the part of the page they’re interested in, rather than having to scroll through it all.
An example on Tyndale’s website is the international student requirements page. At the top is a list of countries as links. When clicked, these links take the user directly to that country’s entrance requirements.
Imagine if this were not the case: a prospective international student would have to scroll through the entire page to find out if their country is represented, and their country-specific information. With the anchor links, they can quickly find what they’re looking for and skip the non-relevant content.
Structure of a page with anchor links
An anchor link has two parts: the anchor (the place the link “jumps” to); and the link which takes you to the anchor.
The anchor is created first, then the link. Typically, the anchors are placed at the main headings of the document.
At the top of the page, a table of contents is created as an unordered (bulleted) list. Each of the document’s headings with anchors is a list item, linked to its anchor.
The table of contents should have a heading before the list. Typically, it will be a Heading level 2 (see “How to use headings” for more on headings).
The heading might read “Table of Contents”; “On this page:”; “Jump to…” or similar wording that indicates to the user that the links will take them to another part of the same page rather than to other pages.
For example, the heading of the table of contents on the International Student Requirements page reads “Jump to requirements for:” and then lists the countries.
How to create anchor links
Create the anchor
To create an anchor:
-
Insert the cursor where you want the link to go, typically at the beginning of a heading.
-
Click the “anchor” button in the text editor. It is second from the right in the second row of buttons, and looks like a flag. This brings up the “Anchor Properties” dialogue:
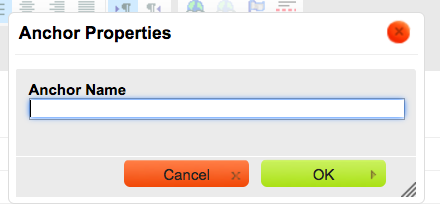
- Enter a name for your anchor. Keep in mind:
- the name should be brief (one word is best)
- the name should be descriptive of the anchor location. For example, if you have a document section with the heading “End of Year Exams”, you could name the anchor “exams”.
- the name must not contain spaces or any special characters, only upper or lowercase letters. If you use more than one word, separate the words with hyphens or underscores.
- each anchor on a page must have a unique name
- Once you’ve entered the name, click “OK”. You will now see a little anchor icon in the spot where you placed the anchor:
![]()
Link to the anchor
Next, you will create the link to the anchor.
-
In your table of contents at the top of the page, add a list item with the same wording as the heading you are linking to
-
Select this text to highlight it
-
Click the “link” button in the text editor (fourth from the right in the second row of buttons; looks like a globe with chain links)
-
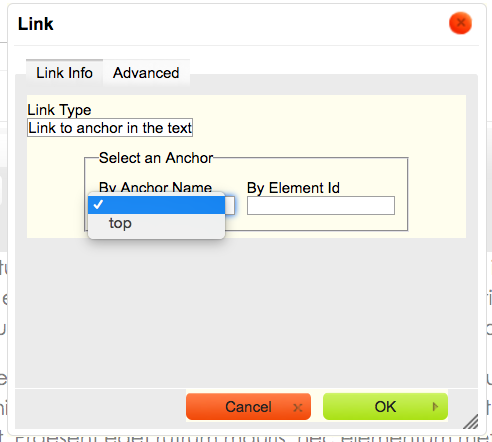
In the Link dialogue box that pops up, click the “Link Type” field, and select “Link to anchor in the text”
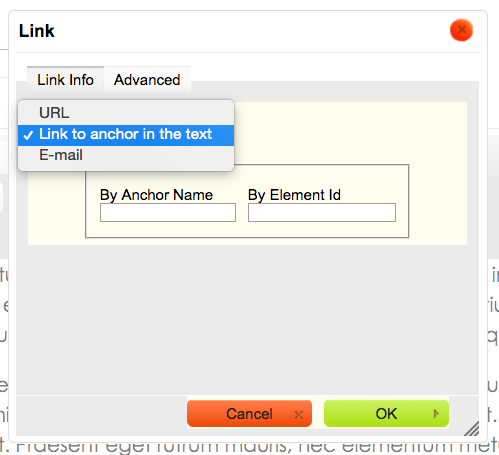
-
Next, click the “By anchor name” field. This will bring up a list of all the anchors you have created in this document, in the order they appear on the page. If you have many anchors on the page, you may need to scroll to see the last ones.
-
Select the anchor you want to link to
-
Click the “OK” button to insert the link.
Test the links
- Don’t forget to save the page and test your links to make sure they work!