WYSIWYG Text Editor
When you create or edit content on the Tyndale website, you will be presented with a mini text editor that allows you to format your content.
Text, images, links, and other website content, are all created with HTML code. However, for those who aren’t familiar with HTML, the WYSIWYG editor allows you to write and format content in familiar ways, while the code is written behind the scenes. WYSIWYG (pronounced “whizzy-wig”) stands for “what you see is what you get”, because unlike code, you get a preview of how your content will look as you create it.
When writing content for the web, it’s best to do most of your writing and editing in a saved document on your computer first, particularly if the content is long. Composing your content online runs the risk of losing your changes if, for example, your internet connection drops. When your content is basically ready, copy and paste it into your webpage. Keep in mind that you will lose any formatting you’ve done in your text document—you will have to format the content using the WYWIWYG editor. You will also have to insert images and other non-text content with the WYSIWYG.
Text editor buttons
The WYSIWYG editor contains several functions, which we’ll go over briefly. Many of these will be familiar from text editors such as Word.
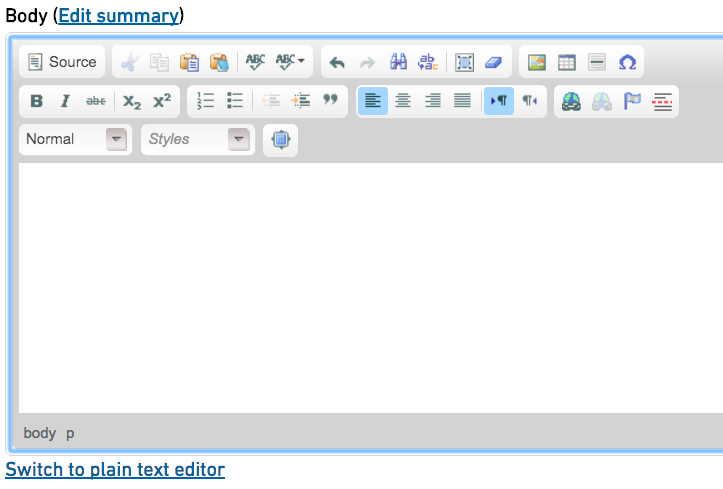
Top row
- Source: if you do have some understanding of HTML, you can use this button to view the code
- Cut
- Copy
- Paste
- Paste as plain text
- Spell check
- Spell check as you type
- Undo
- Redo
- Find
- Replace
- Select all
- Remove format: this is really handy if you’ve formatted text in a particular way, or applied a style to an image, and want to clear it. Just select the content and click this eraser button to wipe any applied formatting.
- Image: this is used to upload and insert images to your content. See how to upload and insert images
- Insert horizontal line: this can be used as a divider between different parts of your content
- Insert Special Character: need an accented vowel or a copyright symbol? You can find it here.
Second row
- Bold
- Italic
- Strikethrough
- Subscript
- Superscript
- Insert/Remove Numbered list
- Insert/Remove Bulleted list
- Decrease indent
- Increase indent
- Blockquote: this is used to format a block of text quoted from another source
- Align left
- Center
- Align right
- Link: This is how you create a link to another webpage or a file. See how to create a link and how to upload and link to a file
- Unlink: use this button to remove a link from text or an image. Just highlight the linked text or image, and click this button to unlink it.
- Anchor: this is used to insert a bookmark, or anchor, in the page, that you can then link to from another part of the page. On very long pages, this allows users to jump directly to particular parts of the content. For more info, see how to create anchor links
- Insert teaser break
Third row
- Format: Headings level 1-6. To create a heading, click to insert the cursor in the text you want to make a heading, click the “Format” dropdown, and click to select the heading level you desire.
Heading levels should be used to create logical structure/outline for a document, so Heading 1 should be the overall title; heading 2 should be for sub-sections; Heading 3 for subsections of subsections; and so on. See How to use headings correctly for accessibility for details.
To remove the heading format, click to insert the cursor in the heading text and select “Normal”. This will revert the heading to a regular paragraph.
- Styles: provides you with different special styles you can apply to text or images. You may want to emphasize important text in a particular way, or give your image a border and make it float to the left or right. To apply styles, click the image to select it, or click and drag with your mouse to select the text; then click the Styles dropdown box and select the style you desire. If you change your mind, highlight the text or image, and click the “remove format” button (the little eraser in the top row) to clear the style and start over.