How to crop and resize images
When to crop or resize images
You may be given an image to place on your webpage which is larger than we want it to appear on the page. In this case, please resize the image before uploading it.
Why?
-
To fit the image within your content
-
To keep the filesize down. Smaller files take up less space on our website servers, and load faster for users. This is especially important for mobile website browsers.
-
Some images have extraneous areas and cropping narrows the focus to the subject
You may be comfortable with image editing tools on the computer, but if you aren’t, or don’t have access to those programs, you can use PicResize, an online photo resizer.
How to resize an image with PicResize
-
On the homepage of PicResize, click the “Browse” button. In the File Upload window, find the image you want to resize. Click the filename to choose it, then click “open”. You can also drag and drop a file from your file browser onto the PicResize uploader.
-
Once you’ve chosen an image, click the “Continue (Resize, Crop, & Special effects)” button
-
On the next page, you will see a preview of your image under “Step 1: Crop and Rotate your Picture”. If you wish to crop, click and drag with the mouse to select the crop area, then click “Crop selection”. If you want to start over with a different selection or not crop the image, click “Deselect”. The “revert to original” button will restore the original, uncropped image.
-
Under “Step 2: Resize your Picture”, the “Make my Picture:” dropdown offers various options: 25% smaller, 50% smaller, 75% smaller, or Custom Size. To the right you can see the pixel dimensions of the original image, then the dimensions that the image will be with the option you’ve selected. Most of the time, you will probably use Custom Size, but one of the percentages may bring the image close to the size you want.
-
When you choose custom size, only enter one dimension: either width (usually), or height. Why? Each image has a particular ratio. If you change the ratio of width to height, the image will be distorted—squeezed or stretched. When you enter only one dimension, the other is automatically calculated to maintain the image’s ratio.
-
What numbers should you enter? How big should your image be? Image dimensions for the web are measured in pixels. The content area of a page on the Tyndale website that has a sidebar is 700 pixels wide. Therefore your images should never be more than 700 pixels wide, and rarely that big.
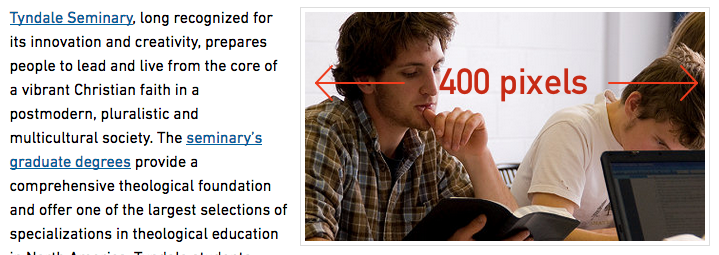
Let’s say you want to insert a photo, and float it to the left or right so the text wraps around it. It shouldn’t be much bigger than about half the width of the content (350 pixels). There will also be margin (spacing) to one side of the image, and perhaps a border around it which also adds width. A good rough maximum width for a floated image would be about 400 pixels, as you can see in this example:
A simple portrait of a person’s face could be smaller, for example 150 x 200 pixels.
-
Please skip over step 3, special effects, when creating images for Tyndale websites.
-
You shouldn’t need to change anything in Step 4, Save As. The image type is automatically detected, and PicResize will save your image in the same file format as the original.
-
Finally, click “I’m done, resize my picture!” This will take you to a screen which offers you 4 options. Clicking “Save to Disk” will open a download window and you can choose where on your computer to save the file.
If you rename the file, keep in mind:
-
the filename should contain no spaces (use dashes - to separate words, if desired)
-
the filename should contain no special characters, only lowercase letters and numbers
-
-
The final step is uploading the resized image to the Tyndale website and inserting it into your content. See How to upload and insert images.