How to Upload and Link to a File
Sometimes you may wish to provide a file, such as a PDF document, on your page for users to view and download. Here's how to do that.
First, create an appropriate filename
Always keep in mind the user who will be viewing and downloading your file. We tend to focus on the content of the file, but the filename is the first way to communicate to the user what it contains. If they come across your file on their computer later on, will they be able to easily tell what it is?
-
The filename should contain “Tyndale” (or your relevant organization or department, such as CCST or TIMCentre). People may download files from different sources—this allows them to easily identify where the file is from.
-
Name the file clearly and descriptively, with relevant information such as date, course name, etc. For example, Tyndale-Seminary-Old-Testament-Syllabus-Fall2017.pdf
-
Remove information from the filename such as draft names or other administrative information that is intended for internal staff but is meaningless to website users. For example, Study Guide (Final Draft).pdf should be renamed to Tyndale-Study-Guide.pdf. New Branding Application Form 2016-2017.pdf should be renamed to Tyndale-Seminary-Application-Form-2016-2017.pdf.
-
Do not include spaces in the filename. These get converted to %20 when the file is uploaded, and can cause the file not to display under some circumstances. Instead, use a hyphen/dash -, or camel case (mix of capitals and lowercase). For example, Name Change Request Form.pdf should be renamed to Name-Change-Request-Form.pdf or NameChangeRequestForm.pdf.
-
Do not include special characters in the filename, such as #, @, $, %, &, etc. Only use letters, numbers, and dashes (hyphens).
-
The filename should be no longer than 31 characters.
Note: We have recently added functionality that will strip spaces and special characters from filenames if you forget. It’s still best to keep these practices in mind when naming your files for the web, and of course this functionality still can’t create a user-friendly and meaningful filename for you!
If the file has already been uploaded to the website, don’t re-upload it—just link to it
Did you know that if a file has already been uploaded, by you or someone else, you can link to it from your page without uploading it again? To find out how, skip the next section on uploading, and go to “Link to the file from your page”.
This has several advantages:
-
One, it saves server space—every time a file gets uploaded, it takes up space
-
Two, when a file gets uploaded with the same name, a _ and number will be added to the end of the filename
-
Three, it saves you time!
If the file hasn’t been uploaded, upload it
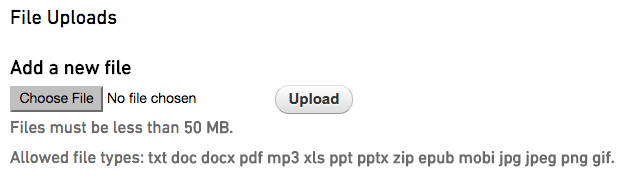
- While you are logged in and creating a new piece of content or editing content, scroll down below the Body field to “File Uploads”
-
Click the “Browse…” or “Choose File” button (wording may differ depending on what browser you are using). This will bring up a file upload window.
-
Navigate to the file on your computer, click to select it, and click “Open” at the bottom of the file upload box.
-
You will now see the filename next to the Browse button. You must click the “Upload” button to the right of the filename to upload the file.
Once it is uploaded, you will see the linked filename in a list under “File uploads”. You can repeat this process to upload as many files as you need.
Link to the file from your page
-
Hover your mouse over the linked filename in the “File uploads” list (or a link to the file on another page, if it’s previously been uploaded), and right-click (Control + click on a Mac).
-
In the list of options that comes up, select “Copy link location” or “Copy link address” (this option may be worded differently depending on what browser you are using).
-
In the Body field of your content, type the text that you want to link. Since links usually open other webpages, please indicate that this is a link to a file, so users aren’t surprised. You can do this by putting the type of file in brackets at the end of but part of the link text, for example: “Study Tips for Success (PDF)”. Other examples are (DOC) or (DOCX) for a Word file, (MP3) for an audio file, etc. (See How to create a link for more information on this and why it’s important.)
-
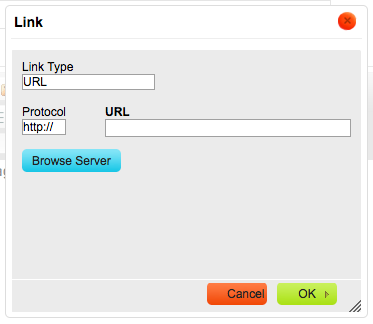
Click and drag with your mouse to highlight the link text. In the text editor, click the Link button (second row of buttons, on the right; looks like a globe with a chain link).

- In the Link dialogue box that comes up, right-click in the URL field and select “Paste” to insert the address of the file that you copied earlier. Click OK to insert the link.
Make sure to always test your links by saving the page and clicking them before submitting your content for approval.